

How To Remove A Car Seat Cover
DIY Seat Encompass Installation to Spruce up Your Motorcar
Updated: Feb. 03, 2022
Make your car's interior look fresh and new with some seat covers
Are your car seats hopelessly stained or torn—or simply apparently ugly? Learn how to gild and install replacement seat covers for both back and front seats.
You might also like: TBD
- Time
- Complexity
- Cost
- A full 24-hour interval
- Beginner
- Varies
Seat cover options
Whether yous fill your vehicle with construction materials, haul kids and grandkids around or but spill lots of coffee, you lot know how piece of cake information technology is for mill seat covers to become grungy. If they're beyond rescuing with an upholstery cleaner and yous want to spruce up your vehicle'due south interior, you accept only three options: Pay a professional person automotive upholsterer to reupholster your seats (well over $ane,000), purchase used seats from a junkyard, or purchase and install seat covers yourself.
Aftermarket seat covers cost as piffling every bit $50 per seat for a universal-fit fashion or about $150 per seat for elevation-of-the- line custom-fit covers. We'll prove you how to lodge and install custom-fit seat covers. The installation is like across makes and models. The job takes almost two hours for front and rear seats. The only tools you'll need are a wire glaze hanger and some tape to fish the straps under plastic trim pieces (if equipped). Everything else is included with the seat covers.
How to buy seat covers
Seat covers come in two styles: universal and custom-fit. You can buy universal seat covers correct off the shelf at an auto parts store or order them online. Custom-fit seat covers must be ordered to fit your exact twelvemonth, brand, model and seat style. They're far more expensive than universal-fit seat covers. Simply they fit like a glove, stay put when you slide in and out, and are more comfortable. Plus, custom-fit seat covers include breakaway stitching so the air pocketbook can deploy properly if your vehicle has side bolster air bags.
To get around the air bag consequence and keep costs downward, universal seat covers just eliminate the fabric that would ordinarily cover the seat air numberless. Then, to reduce slipping, the manufacturers glaze the underside of the textile with an anti-skid rubber. That makes them a bit more than uncomfortable to sit on for long periods. And they volition inevitably sideslip out of identify and wrinkle because they're not an exact fit for your seats.
For some foreign reason nosotros don't sympathize, officially licensed designer camouflage and sports patterns are the most pop seat comprehend fabrics these days. Since the cloth designers get a royalty on every sale, y'all'll pay more for those patterns. If you desire to keep the cost down, skip the trendy camo and sports fabrics and choose a solid color.
If you lodge custom-fit seat covers, you'll have the option of also ordering matching armrest and headrest covers, console covers, seat dorsum storage and map pockets.
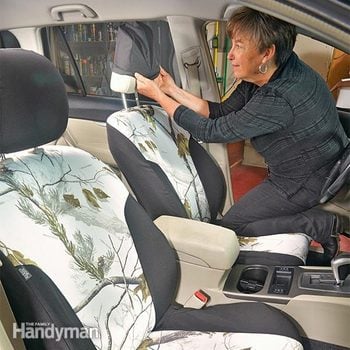
Buy custom-fit and universal seat covers from retail and online auto parts stores, or directly from the manufacturer. We bought the custom-fit seat covers for this 2010 Subaru Outback at nwseatcovers.com. Nosotros bucked up and picked the trendy Neb Jordan Realtree AP Snow camo blueprint and added headrest covers. The front seat covers price $341 and the rears, $331. Here'southward how they install.
When You Install New Seat Covers
Note: Nosotros couldn't show you lot the trim disconnect and seat encompass zipper points with the seat notwithstanding in the vehicle. So we bought a junkyard Subaru seat to testify how everything fits together. You don't have to remove the seats from the vehicle to install new seat covers. And since most seats are made the same manner, these instructions will piece of work with the majority of makes and models. However, if the seat embrace manufacturers' instructions differ from ours, follow theirs instead.
Start with the front seat covers
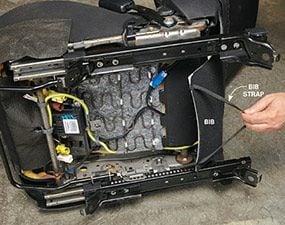
Photo 1: Release the bib panel
Follow the bib panel straps and unclip them from the springs or pull the elastic straps out from under the springs. Then lift the bib panel up to access the gap between the dorsum and the bottom absorber.

Photo ii: Thread the straps through the gap
Push the bottom cushion straps through the gap betwixt the seat dorsum and the lesser cushion. And so pull the straps completely through until the seat cover is taut.
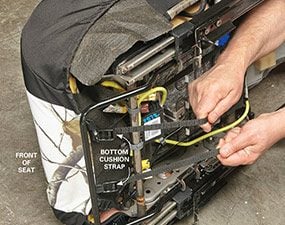
Photograph iii: Buckle the seat absorber straps
Route the bottom cushion straps toward the front end of the seat, making sure the straps don't interfere with the seat adjuster mechanism. Thread the strap into the buckle and cinch it tight to remove wrinkles in the seat encompass.
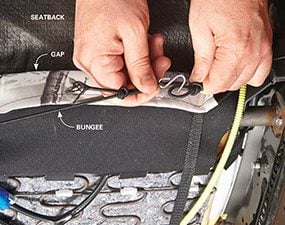
Photo iv: Tighten and connect the bungee cords
Pull the bungee cords to cinch the skirt on the bottom seat encompass. Then connect the ends using the supplied S-hook.
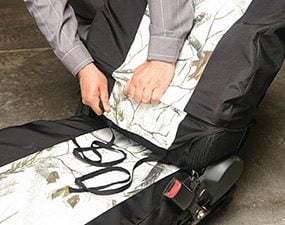
Photo v: Install the seatback cover
Pull the encompass down until it reaches the side bolsters (cushions). So shrink the eternalize while yous pull the fabric down to the bottom.
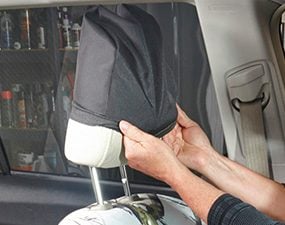
Photo 6: Install the headrest covers
Stretch the elastic edges around the headrest and pull it down. Tug at the cover fabric until information technology fits smoothly on the contour of the headrest.
The bottom seat cushion covers usually adhere to the seat with straps, buckles and S-hooks. Y'all'll have to thread bottom absorber straps through the gap between the seat back and the bottom cushions (where the dorsum reclines). That's easy in older vehicles. Merely the gap in newer vehicles is usually covered with a "bib" panel. Don't worry. The bib is like shooting fish in a barrel to disconnect. It's connected to the seat springs with either clips or an elastic strap. Merely accomplish under the seat and disconnect the straps (Photograph 1). Then lift the bib to access the gap.
Side by side, fit the seat cover onto the lesser cushion and thread the rear straps through the gap (Photo ii). Road the straps toward the front end buckles and tighten (Photo 3). And so connect the bungee cords (Photo 4). Tuck the puckered seat comprehend "brim" behind the plastic trim panels (if equipped).
Remove the headrests. Then slide the cover over the seat dorsum cushion (Photo v). Push the bottom straps through the gap and into the buckles just like yous did on the bottom cushion (refer to Photo iii). Reconnect the bib panel and pull downward on the rear portion of the seat dorsum encompass to remove wrinkles. Then stick the claw-loop edge to the bib to secure it. Stretch the headrest covers onto the headrest (Photograph 6) and reinstall them on the seats.
And so move to the backseats
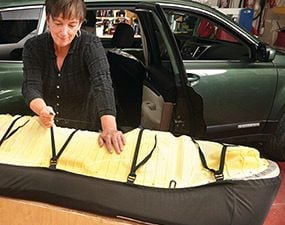
Photo 7: Install rear bench seat comprehend
Fit the cover onto the demote seat and thread the straps into the buckles. Tighten until snug. Check the fit and arrange. And so tighten the buckles, secure the bungee cords and connect the remaining straps to the springs with South-hooks.
If your vehicle has 60/xl rear bench seats, remove the bottom cushion outset. If you accept saucepan seats in the rear, install them just like you did on the forepart seats. To remove a bench seat lesser cushion, run your mitt along the front edge to locate the latch points. Endeavor jerking straight upwards at the latch points. If the absorber doesn't release, push it direct back equally yous lift up to release it from the hook latches. And then remove the entire bottom cushion from the vehicle and prepare information technology on a bench. Install the lesser absorber seat cover with straps and Due south-hooks (Photo 7). Remove the rear headrests and slide the rear seat back covers onto the rear seats. Secure with the attached hook-and-loop fasteners. Add headrest covers and replace the headrests. You're washed.
Add a Bun Warmer and Lumbar Support
If your vehicle didn't come with seat heaters, now's the fourth dimension to add together them. Addition electric seat heaters fit between your existing seat cushions and the new seat covers and secure with elastic bands and straps. The seat heater control connects to a cigarette lighter or power outlet. The model nosotros show here (the ProHeat pad and controller; about $85 from nwseatcovers.com) has an adjustable heat setting and automatic shutoff to prevent bombardment drain (in instance you lot forget to plow it off). And, if you want lumbar support, slide this unit of measurement (about $70 at nwseatcovers.com) under the seat back cover earlier strapping it in place. Route the pump and tube out to the side. Once the seat covers are fully installed, suit the compactness with the pump.
Required Materials for this Project
Avert last-minute shopping trips by having all your materials set up ahead of time. Here'due south a list.
Originally Published: December xiii, 2022
Source: https://www.familyhandyman.com/project/spruce-up-your-car-how-to-install-seat-covers/
0 Response to "How To Remove A Car Seat Cover"
Post a Comment